Network Threat Detection with Suricata
Wazuh is an open-source security platform that provides unified threat detection, file integrity monitoring, and compliance management across diverse environments. In this post I’ll show how I setup Suricata to monitor network activity. As well how I used Kali Linux, DVWA, and tmNIDS for testing.
‣ Prerequisites
• PNET Lab
-
How to install Pnet Lab on Proxmox
NETWORK CONFIGURATION
‣ TOPOLOGY

• Suricata
-
192.168.69.3
• tmNIDS
-
192.168.69.7
• DNWA
-
192.168.69.4
• Kali Linux
-
192.168.69.6
• Wazuh
-
192.168.69.2
ROUTER
First, I set G0/0 to automatically obtain an IP address via DHCP and to enable the interface.
					Router> enable
Router# configure terminal
Router(config)# interface GigabitEthernet0/0
Router(config-if)# ip address dhcp
Router(config-if)# no shutdown
Router(config-if)# exit
Router(config)#
I then ran the following to see which IP the interface was given.
Router(config)# do show ip interface brief
I then set a default route, so that the VM’s I install can reach the internet and are able to download necessary updates.
Router(config)# ip route 0.0.0.0 0.0.0.0 10.0.137.1
I then setup NAT on G0/1.
					Router(config)# interface GigabitEthernet0/1
Router(config-if)# ip nat inside
Router(config-if)# exit
ip nat inside– This command marks the interface as an ‘inside’ interface for NAT, meaning that it connects to the internal network where private IP addresses are used.
Then setup NAT on G0/0, the interface facing the internet.
					Router(config)# interface GigabitEthernet0/0
Router(config-if)# ip nat outside
Router(config-if)# exit
ip nat outside– This command designates the interface as the external side of the NAT setup, typically connected to the internet.
I then created an ACL for the internal network, and configured PAT on interface G0/0.
					Router(config)# access-list 1 permit 192.168.69.0 0.0.0.255
Router(config)# ip nat inside source list 1 interface GigabitEthernet0/0 overload
access-list– This command defines ACL 1, which permits traffic from the IP address range 192.168.69.0 through 192.168.69.255.ip nat inside source list 1– Tells the router to translate the source IP addresses that much ACL 1.overload– Enables Port Address Translation, meaning multiple internal hosts can share the single external IP address by differentiating traffic using port numbers.
I then assigned an IP address to G0/1.
					Router(config)# interface GigabitEthernet0/1
Router(config-if)# ip address 192.168.69.1 255.255.255.0
Router(config-if)# no shutdown
Router(config-if)# exit
Router(config)#
I also included that IP address from the DHCP pool.
Router(config)# ip dhcp excluded-address 192.168.69.1
I then created the DHCP pool that all the VM’s will use.
					Router(config)# ip dhcp pool LabPool
Router(dhcp-config)# network 192.168.69.0 255.255.255.0
Router(dhcp-config)# default-router 192.168.69.1
Router(dhcp-config)# exit
ip dhcp pool– Creates the DHCP pool..network– Defines the network the pool will assign IP addresses from.default-router– Sets the default gateway for clients receiving an IP address from this pool.
Then finally saved the configuration
					Router(config)# exit
Router# copy run start
SWITCH
The only thing I needed to setup on the switch is port mirroring (SPAN).
					Switch> enable
Switch# configure terminal
Switch(config)# monitor seasion 1 source interface gigabitethernet0/1
Switch(config)# monitor session 1 source interface gigabitethernet0/3
Switch(config)# monitor session 1 source interface gigabibethernet1/0
Switch(config)# monitor session 1 source interface gigabitethernet1/1
Switch(config)# monitor session 1 source interface gigabitethernet1/2
Switch(config)# monitor session 1 source interface gigabitethernet1/3
Switch(config)# monitor session 1 destination interface gigabitethernet0/2
Switch(config)# end
destination interface– This leads to the 2nd interface on my Suricata server.
Then I saved the configuration.
Switch# copy run start
Suricata Server
‣ PREREQUISITES
• Ubuntu 22.04 Server
• 2 NICs
‣ MY SETUP
• VIRTUAL MACHINE
-
Ubuntu 22.04
• NETWORK INTERFACES
WAZUH AGENT
Note
To see how to install Wazuh, you can look at my blog post here: Installing a Wazuh Cluster with Load Balancing
Wazuh provides an easy way to install Agent. I went to the left-side menu and went to Agents management > Summary.
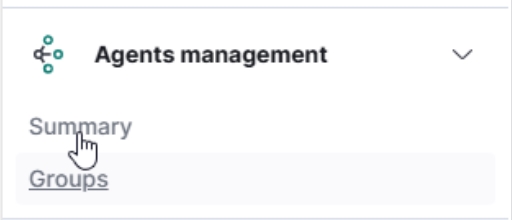
Then clicked on ‘Deploy new agent’.

I then selected DEB amd64, and entered the IP address of my Wazuh server.
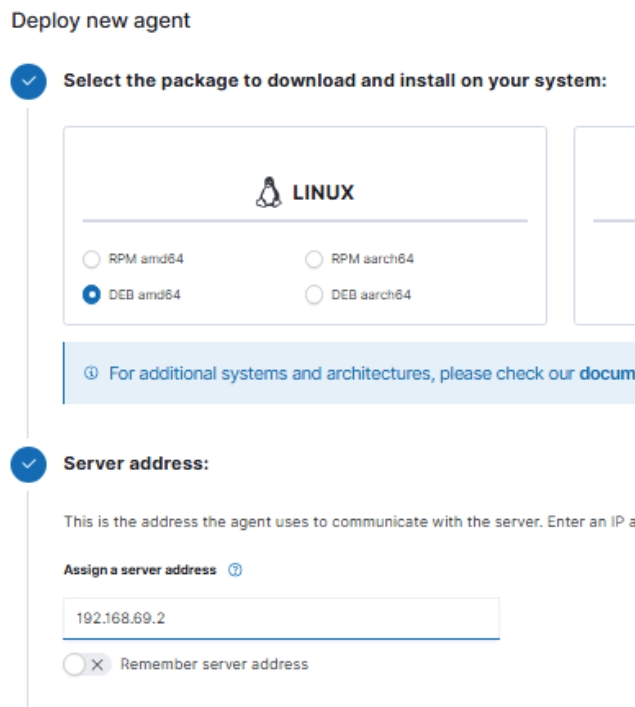
I scrolled down and it automatically created an install command.

I then went to my Suricata server and ran the command.
wget https://packages.wazuh.com/4.x/apt/pool/main/w/wazuh-agent/wazuh-agent_4.10.1-1_amd64.deb && sudo WAZUH_MANAGER='192.168.69.2' dpkg -i ./wazuh-agent_4.10.1-1_amd64.deb
Then noted the directions on starting the agent.
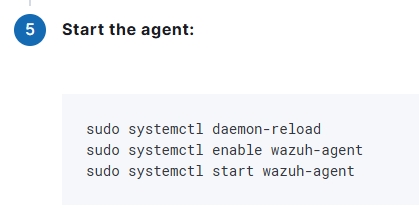
Went back to the Suricata server and ran those commands.
					sudo systemctl daemon-reload
sudo systemctl enable wazuh-agent
sudo systemctl start wazuh-agent
NETWORK SETUP
First, I needed to see the names of my interfaces.
ip add
I then turned on promiscuous mode on 1 of them, which this interface will capture all traffic on the network.
sudo ip link set ens3 promisc on
I then edited the following config.yaml file.
sudo nano /etc/netplan/00-installer-config.yaml
I set ens3 to not have an IP address, and assigned the 2nd interface (ens4) a static IP.
					network:
renderer: networkd
ethernets:
ens3:
dhcp4: no
ens4:
dhcp4: no
addresses:
- 192.168.69.3/24
routes:
- to: 0.0.0.0/0
via: 192.168.69.1
nameservers:
addresses:
- 8.8.8.8
- 8.8.4.4
version: 2
Note
For some reason it won’t let me do the correct spacing on the commad above.
I then applied the configuration.
sudo netplan apply
INSTALLATION
First, I added the stable package of Suricata to my repository.
sudo add-apt-repository ppa:oisf/suricata-stable
I then updated my packages.
sudo apt-get update
Then installed Suricata.
sudo apt-get install suricata –y
I then downloaded the ET ruleset to the /tmp/ directory.
cd /tmp/ && curl -LO https://rules.emergingthreats.net/open/suricata-6.0.8/emerging.rules.tar.gz
Next, I extracted the file, and moved any files that end with ‘.rules’ to /etc/suricata/rules/.
sudo tar -xvzf emerging.rules.tar.gz && sudo mv rules/*.rules /etc/suricata/rules/
I then changed the permissions for any ‘.rules’ file.
sudo chmod 640 /etc/suricata/rules/*.rules
Then I needed to edit the suricata.yaml file.
sudo nano /etc/suricata/suricata.yaml
I then made the following changes.
					HOME_NET: "192.168.69.0/24"
 EXTERNAL_NET: "any"

 # Linux high speed capture support
 af-packet:- interface: ens3

 default-rule-path: /etc/suricata/rules
 rule-files:- "*.rules"
HOME_NET– I entered the subnet I wanted to monitor.af-packet– I changed it to the interface I enabled promiscuous mode on.default-rule-path– This setting is at the very bottom of the file.
I then restarted Suricata.
sudo systemctl restart suricata
Next I needed to edit the ossec.conf file.
sudo nano /var/ossec/etc/ossec.conf
I added the following to the very bottom of the file.
					<ossec_config>
 <localfile>
 <log_format>json</log_format>
 <location>/var/log/suricata/eve.json</location>
 </localfile>
 </ossec_config>
Lastly, I restarted the wazuh-agent.
sudo systemctl restart wazuh-agent
TESTING
‣ MY SETUP
• VIRTUAL MACHINES
-
DVWA
-
tmNIDS
-
Kali Linux
-
Windows 10
DVWA INSTALLATION
DVWA is an intentionally infected web application. I used it to test web-based attacks like SQL injection and a reflected XSS attack.
I needed to install DVWA so first I installed all the necessary depenencies.
sudo apt -y install apache2 mariadb-server php php-mysqli php-gd libapache2-mod-php
Then I ran the initial database setup.
sudo mysql_secure_installation
I then logged in MariaDB as root.
mysql -u root
I then created a user for the DVWA database, set their password, and gave them full control over the database.
					CREATE USER 'dvwa'@'localhost' IDENTIFIED BY 'password'; GRANT ALL PRIVILEGES
ON dvwa.* TO 'dvwa'@'localhost' IDENTIFIED BY 'password';
Then I changed to the Web Root directory.
cd /var/www/html
I then cloned the DVWA repository.
sudo git clone https://github.com/digininja/DVWA.git
Next, I copied the sample configuration file to create the actual configuration file.
cp /var/www/html/DVWA/config/config.inc.php.dist /var/www/html/DVWA/config/config.inc.php
I then edited that file.
sudo nano /var/www/html/DVWA/config/config.inc.php
I made sure to change the user and password to the ones I setup when creating the database.
					'DB_USER') ?: 'dvwa';
'DB_PASSWORD') ?: 'password';
I then started the MySQL server.
systemctl start mysql
Next, I ended the php.ini file.
/etc/php/8.1/apache2/php.ini
I then searched for ‘allow_url_iclude’ and changed it to ‘On’.
allow_url_include=On
Then went to http://<vm_ip>/DVWA/setup.php and clicked on ‘Create/Reset Database’.
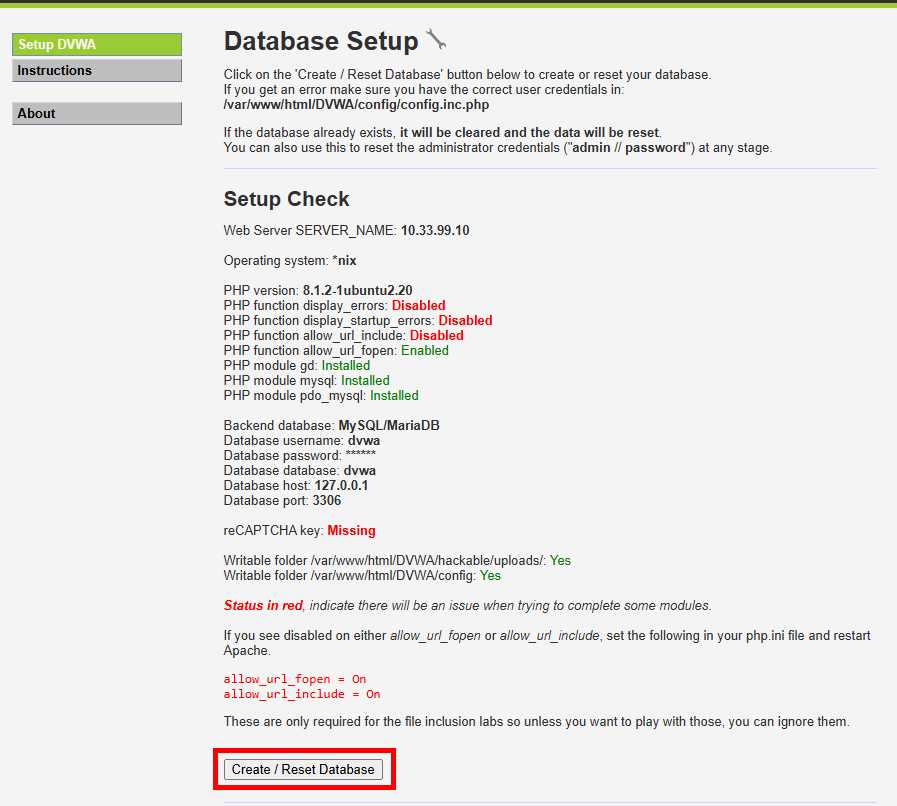
The page will refresh and I was able to login with the default credentials; admin:password.

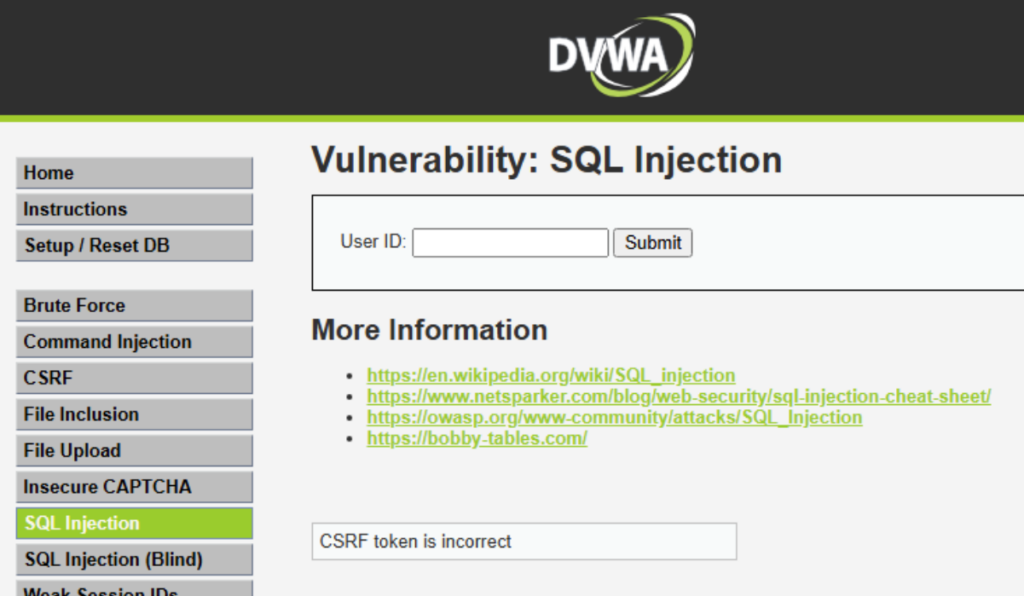
SQL INJECTION ATTACK
To test SQL injection, I typed the following URL into a browser from a Windows 10 machine.

					http://<DVWA_IP_ADDRESS>/DVWA/vulnerabilities/sqli/?id=a' UNION SELECT "Hello","Hello
Again";-- -&Submit=Submit
If entered correctly it’ll take you to this page.
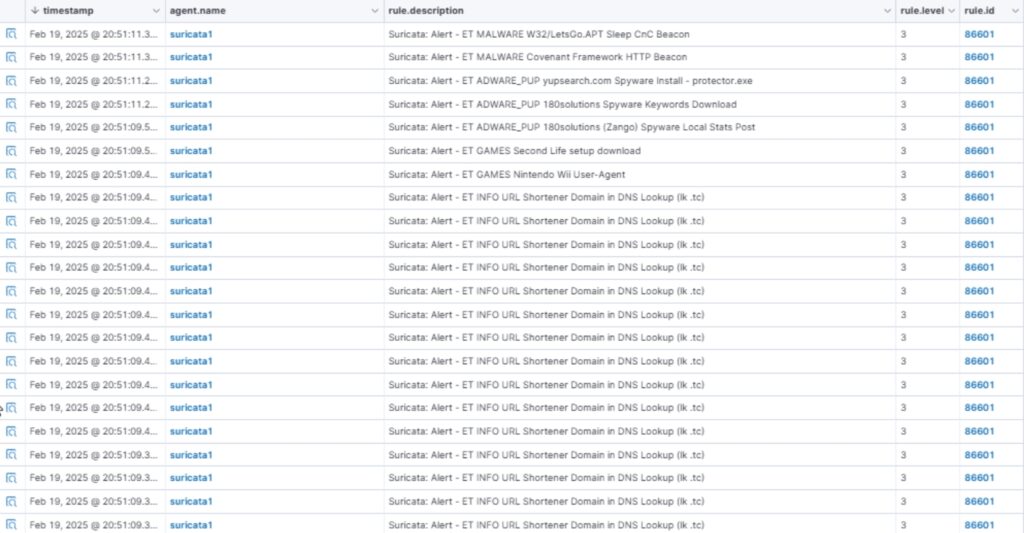
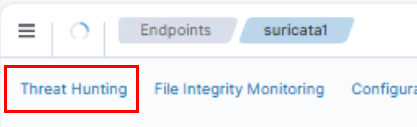
To check if Suricata captured it, I logged into Wazuh and went to Endpoints > suricata1 > Threat Hunting.
Then clicked on the ‘Events’ tab.
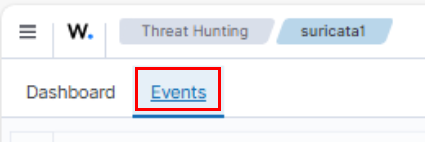
And the latest update show it did.

tmNIDS INSTALLATION
Installing tmNIDS only takes one command.
					curl –sSL https://raw.githubusercontent.com/3CORESec/testmynids.org/master/tmNIDS> -o
/tmp/tmNIDS && chmod +x /tmp/tmNIDS && /tmp/tmNIDS
Then this should pop up.
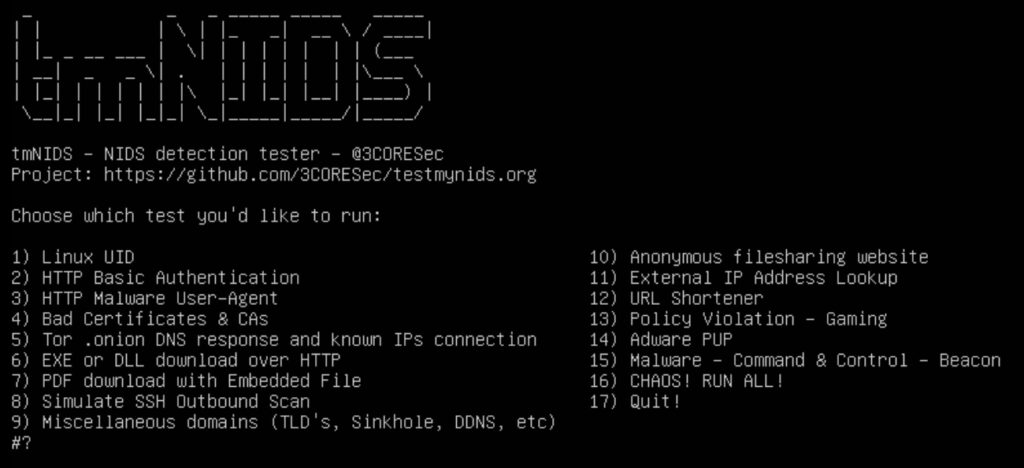
tmNIDS
First, I tested HTTP Malware User-Agent and saw the following alerts.

After running ‘CHAOS! RUN ALL!’ I got the following errors (some of them).